SpringBoot项目实战(2):集成SpringBoot
温馨提示:
本文最后更新于 2017年04月07日,已超过 2,874 天没有更新。若文章内的图片失效(无法正常加载),请留言反馈或直接联系我。
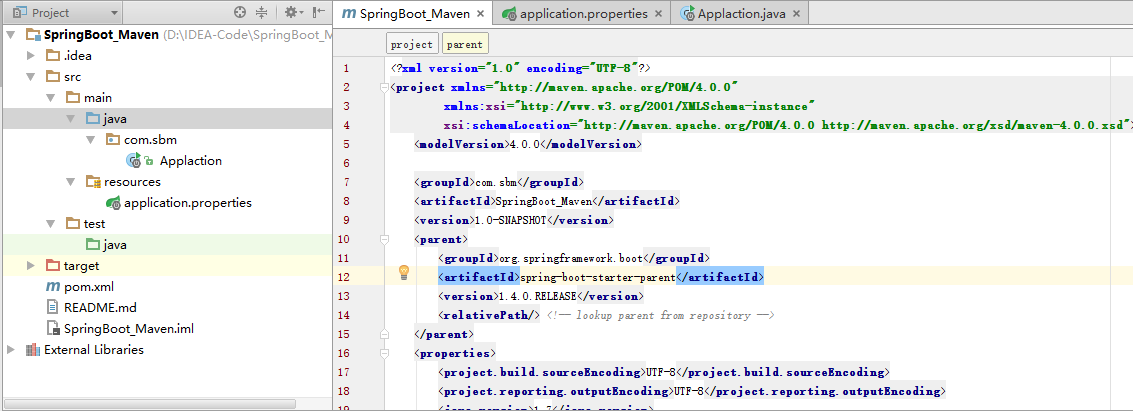
项目结构图

1.pom文件添加SpingBoot依赖
    <modelVersion>4.0.0</modelVersion>
    <groupId>com.sbm</groupId>
    <artifactId>SpringBoot_Maven</artifactId>
    <version>1.0-SNAPSHOT</version>
    <parent>
        <groupId>org.springframework.boot</groupId>
        <artifactId>spring-boot-starter-parent</artifactId>
        <version>1.4.0.RELEASE</version>
        <relativePath/> <!-- lookup parent from repository -->
    </parent>
    <properties>
        <project.build.sourceEncoding>UTF-8</project.build.sourceEncoding>
        <project.reporting.outputEncoding>UTF-8</project.reporting.outputEncoding>
        <java.version>1.7</java.version>
    </properties>
    <dependencies>
    <!--支持 Web 应用开发,包含 Tomcat 和 spring-mvc。 -->
    <dependency>
        <groupId>org.springframework.boot</groupId>
        <artifactId>spring-boot-starter-web</artifactId>
    </dependency>
    <dependency>
        <groupId>org.springframework.boot</groupId>
        <artifactId>spring-boot-starter-test</artifactId>
        <scope>test</scope>
    </dependency>
    <!--模板引擎-->
    <!--  <dependency>
          <groupId>org.springframework.boot</groupId>
          <artifactId>spring-boot-starter-thymeleaf</artifactId>
      </dependency>-->
    <dependency>
        <groupId>org.springframework.boot</groupId>
        <artifactId>spring-boot-starter-freemarker</artifactId>
    </dependency>
    <!--Json Support-->
    <dependency>
        <groupId>com.alibaba</groupId>
        <artifactId>fastjson</artifactId>
        <version>1.1.43</version>
    </dependency>
    <!--springboot中修改完文件后自动reload的插件,修改完文件Ctrl + F9 Make一下就可以-->
    <dependency>
        <groupId>org.springframework</groupId>
        <artifactId>springloaded</artifactId>
        <version>1.2.3.RELEASE</version>
    </dependency>
    <!--springboot中修改完文件后自动reload的插件 end-->
</dependencies>
<build>
<plugins>
    <plugin>
        <groupId>org.springframework.boot</groupId>
        <artifactId>spring-boot-maven-plugin</artifactId>
        <dependencies>
            <dependency>
                <groupId>org.springframework</groupId>
                <artifactId>springloaded</artifactId>
                <version>1.2.3.RELEASE</version>
            </dependency>
        </dependencies>
    </plugin>
</plugins>
</build>
        <!--配置远程仓库地址-->
<repositories>
<repository>
    <id>spring-milestone</id>
    <url>https://repo.spring.io/libs-release</url>
</repository>
</repositories>
        <!--配置远程仓库地址-->
<pluginRepositories>
<pluginRepository>
    <id>spring-milestone</id>
    <url>https://repo.spring.io/libs-release</url>
</pluginRepository>
</pluginRepositories>
2.项目启动程序Applaction.java
package com.sbm;
import org.apache.ibatis.session.SqlSessionFactory;
import org.apache.tomcat.jdbc.pool.DataSource;
import org.mybatis.spring.SqlSessionFactoryBean;
import org.mybatis.spring.annotation.MapperScan;
import org.mybatis.spring.mapper.MapperScannerConfigurer;
import org.springframework.beans.factory.annotation.Autowired;
import org.springframework.boot.SpringApplication;
import org.springframework.boot.autoconfigure.EnableAutoConfiguration;
import org.springframework.boot.autoconfigure.SpringBootApplication;
import org.springframework.boot.context.properties.ConfigurationProperties;
import org.springframework.context.annotation.Bean;
import org.springframework.context.annotation.ComponentScan;
import org.springframework.core.io.support.PathMatchingResourcePatternResolver;
import org.springframework.jdbc.datasource.DataSourceTransactionManager;
import org.springframework.transaction.PlatformTransactionManager;
import org.springframework.transaction.annotation.EnableTransactionManagement;
import org.springframework.web.bind.annotation.RequestMapping;
import org.springframework.web.bind.annotation.RestController;
/**
 * sbm
 * Created by yadong.zhang on com.sbm.application
 * User:yadong.zhang
 * Date:2016/10/20
 * Time:18:15
 */
/**
 * 1).@SpringBootApplication标注启动配置入口,run()方法会创建一个Spring应用上下文(Application Context)。
 * SpringBoot通过启动内嵌的Servlet容器(默认tomcat)用来处理Http请求。
 * 2).@RestController是特殊的Controller,他的返回值直接作为Http Response的Body部分返回给浏览器
 * 3).Spring WebMvc框架会将Servlet容器里收到的Http请求根据路径分发到对应的@Controller下进行处理。
 */
@EnableAutoConfiguration
@SpringBootApplication
@ComponentScan
//@RestController
public class Applaction {
    @RequestMapping("/")
    public String index(){
        return "Spring Boot Application...";
    }
    public static void main(String[] args) {
        SpringApplication.run(Applaction.class, args);
    }
}
3.测试Controller
package com.sbm.controller;
import com.sbm.service.IMessageService;
import org.springframework.stereotype.Controller;
import org.springframework.ui.Model;
import org.springframework.web.bind.annotation.PathVariable;
import org.springframework.web.bind.annotation.RequestMapping;
import org.springframework.web.bind.annotation.ResponseBody;
import javax.annotation.Resource;
import java.util.Date;
import java.util.HashMap;
import java.util.Map;
/**
 * sbm
 * Created by yadong.zhang on com.sbm.controller
 * User:yadong.zhang
 * Date:2016/10/20
 * Time:18:26
 */
@Controller
public class HelloController {
    @RequestMapping("/hello/{name}")
    public String hello(@PathVariable("name") String name, Model model) {
        model.addAttribute("name", name);
        model.addAttribute("age","25");
        model.addAttribute("sex","man");
        model.addAttribute("birth",new Date());
        return "hello";
    }
    @RequestMapping("/json")
    @ResponseBody
    public Map<String,Object> json(){
        Map<String,Object> map = new HashMap<String,Object>();
        map.put("name","Flyat");
        map.put("age","25");
        map.put("sex","man");
        return map;
    }
}
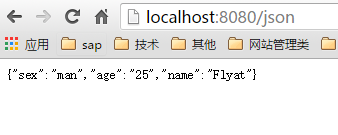
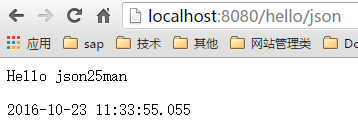
4.看效果


前台页面渲染是使用的Freemarker模板,下节总结
项目地址:GitHub地址,点击查看
其他相关文章
正文到此结束
- 本文标签: Java Spring Spring Boot Maven
- 本文链接: https://www.zhyd.me/article/23
- 版权声明: 本文由张亚东原创发布,转载请遵循《署名-非商业性使用-相同方式共享 4.0 国际 (CC BY-NC-SA 4.0)》许可协议授权
热门推荐
相关文章
该篇文章的评论功能已被站长关闭


